Writing Games with Processing: Intro Screen

24. December, 2013

Merry Christmas, everyone πŸ™‚

In the last post, we cleaned up the code. This makes it now very simple to add an intro to the game:

class IntroState extends State {
  
  Player p;
  Enemy e;
  Step playerStep;
  Step enemyStep;
  
  void setup() {
    
    playerStep = new Step();
    playerStep.x += + 3*tileSize;
    
    p = new Player();
    
    e = new Enemy("Kenny");

    enemyStep = new Step();
    
    frameRate(10);
  }

The class Step adds a very simple movement algorithm to the player and enemy we created in setup():

class Step {
  int minX = tileSize * 3;
  int minY = tileSize * 3;
  int maxX = width - (tileSize * 3);
  int maxY = height - (tileSize * 3);

  int x = minX;
  int y = minY;
  int dx = tileSize;
  int dy = 0;
  
  void next() {
    int newX = x + dx;
    int newY = y + dy;
    
    if(newX > maxX) {
      newX = maxX;
      dx = 0;
      dy = tileSize;
      newY += dy;
    } else if(newY > maxY) {
      newY = maxY;
      dx = -tileSize;
      dy = 0;
      newX += dx; 
    } else if(newX < minX) {
      newX = minX;
      dx = 0;
      dy = -tileSize;
      newY += dy;
    } else if(newY < minY) {
      newY = minY;
      dx = tileSize;
      dy = 0;
      newX += dx; 
    }
    
    x = newX;
    y = newY;
  }
}

The code simply moves a coordinate along the outline of a rectangle. Using this code, we can move the player and enemy and then render the screen:

  void draw() {
    movePlayer();
    moveEnemy();
    
    drawBackground();
    p.draw();
    e.draw();
  }
  
  void movePlayer() {
    playerStep.next();
    p.x = playerStep.x;
    p.y = playerStep.y;
  }
  
  void moveEnemy() {
    enemyStep.next();   
    e.x = enemyStep.x;
    e.y = enemyStep.y;
  }

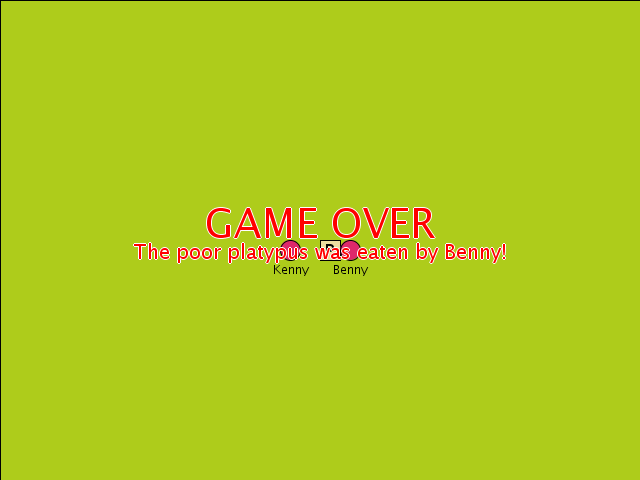
drawBackground() is similar to the code in the main game code. Only this time, we display the game title and a short explanation what the game is about.

We could also use this to display a high score list, etc.

  void drawBackground() {
    fill(174, 204, 27);
    rect(0, 0, width, height);
    
    textAlign(CENTER, TOP);
    textSize(40);
    color outline = color(255,255,255);
    color fill = color(0,0,0);
    int y = height/2 - 60;
    textWithOutline("Run, Platty, Run!", width/2, y, outline, fill);
    y += 50;
    
    textSize(20);
    textWithOutline("Use cursor keys to evade the hungry crocodiles", width/2, y, outline, fill);
    y += 40;
    
    outline = color(0,0,255);
    fill = color(255,255,255);
    textWithOutline("Press any key to start", width/2, y, outline, fill);
    y += 20;
  }

The last element we need is a key handler which starts the game itself:

  void keyPressed() {
    changeState(new MainGame());
  }

Easy, isn’t it? Just imagine how complex this might have been without the refactoring. We might have ended up with a draw() method with several if(), checking for the current state of the game, trying to avoid messing with the wrong variables, …

By splitting the game into steps, each step can do it’s own thing. This is the major goal of refactoring: Cutting down dependencies.

The whole project can be cloned from here. The version of this blog post is tagged with v9.

Cool, our game is almost complete. One last thing is missing: Displaying the high score table.

Previous: Cleaning Up
First post: Getting Started


Writing Games with Processing: Cleaning Up

23. December, 2013

While the code for our game is simple enough, it’s starting to get messy. movePlayer() contains code to move the player, the enemies and the collision detection.

Also, the game ends when you win. There is no way to restart. I could add that but it would make the code … ugly. Time to refactor.

Refactoring, in a nutshell, means to change the internal structure of the code without changing the behavior.

Sounds futile? Nope. The goal of refactoring to make the code easier to maintain and extend.

Right now, the some code related to enemies is in the Enemy class but code for the player is spread all over the place. Time to create a Player class.

class Player {
  int x = 320, y = 240;

  void draw() {
    fill(235,220,160);
    rect(x, y, tileSize, tileSize);
    
    fill(0);
    textSize(tileSize-2);
    textAlign(CENTER, CENTER);
    text("P", x+tileSize/2, y+tileSize/2-2);
  }
  
  void move(int dx, int dy) {
    dx *= tileSize;
    dy *= tileSize;
    
    int newX = x + dx;
    int newY = y + dy;
    if(newX >= 0
      && newX < width
      && newY >= 0
      && newY < height
    ) {
      x = newX;
      y = newY;
    }
  }
}

That looks much better. Next, we’ll have several states that the game can be in: Intro, game running, game over, high score.

They all have similar properties: They respond to keys and they draw something on the screen. With the current code, that would be clumsy to implement.

So I add a new class:

class State {
  void setup() {}
  void draw() {}
  void keyPressed() {}
}

Now, I can move all the code to run the game into a new class MainGame which extends State:

class MainGame extends State {
  ArrayList<Enemy> enemies = new ArrayList<Enemy>();
  Player player;
  
  void addEnemy(int x, int y, String name) {
    Enemy enemy = new Enemy(name);
    enemy.x = x;
    enemy.y = y;
    enemies.add(enemy);
  }
  
  void drawEnemies() {
   for(Enemy e: enemies) {
      e.draw();
    }
  }

  void setup() {
    player = new Player();
  
    addEnemy(20, 20, "Kenny");
    addEnemy(600, 20, "Benny");
  }

  void drawBackground() {
    fill(174, 204, 27);
    rect(0, 0, width, height);
      
    fill(0);
    textAlign(LEFT, TOP);
    textSize(20);
    text("Scrore: "+score, 2, 2);
  }
  
  void draw() {
    drawBackground();
    player.draw();
    drawEnemies();
  }
  
  void moveEnemies() {
    for(Enemy e: enemies) {
      e.hunt(player.x, player.y);
    }
  }
  
  void checkCollisions() {
    ArrayList<Enemy> enemiesToCheck = new ArrayList<Enemy>();
    
    for(Enemy e: enemies) {
      if(e.closeTo(player.x, player.y)) {
        gameOver(e);
        return;
      }
      
      for(Enemy e2: enemiesToCheck) {
        if(e.closeTo(e2.x, e2.y)) {
          e.fighting = true;
          e2.fighting = true;
        }
      }
      
      enemiesToCheck.add(e);
    }
    
    int notFighting = 0;
    for(Enemy e: enemies) {
      if(!e.fighting) {
        notFighting ++;
      }
    }
    
    score ++;
    if(notFighting == 0) {
      youWon(enemies.size());
    }
  }
  
  void movePlayer(int dx, int dy) {
    player.move(dx, dy);
    moveEnemies();
    checkCollisions();
  }
  
  void keyPressed() {
    if(key == CODED) {
      if(keyCode == UP) {
        movePlayer(0, -1);
      } else if(keyCode == DOWN) {
        movePlayer(0, 1);
      } else if(keyCode == LEFT) {
        movePlayer(-1, 0);
      } else if(keyCode == RIGHT) {
        movePlayer(1, 0);
      }
    } else if(key == ' ') {
      movePlayer(0, 0);
    }  
  }  
}

Next, we can move the code for “game over” into a new GameOverWonState and GameOverLostState:

class GameOverWonState extends State {
  MainGame main;
  int numberOfEnemies;
  
  GameOverWonState(MainGame main, int numberOfEnemies) {
    this.main = main;
    this.numberOfEnemies = numberOfEnemies;
  }
  
  void draw() {
    main.draw();
  
    textAlign(CENTER, TOP);
    textSize(40);
    color outline = color(255,255,255);
    color fill = color(255,0,0);
    textWithOutline("YOU WON!", width/2, 200, outline, fill);
    
    textSize(20);
    textWithOutline("The cute platypus outsmarted "+numberOfEnemies+" crocodiles!", width/2, 240, outline, fill);    
  }
}

class GameOverLostState extends State {
  MainGame main;
  Enemy e;
  
  GameOverLostState(MainGame main, Enemy e) {
    this.main = main;
    this.e = e;
  }
  
  void draw() {
    main.draw();
  
    textAlign(CENTER, TOP);
    textSize(40);
    color outline = color(255,255,255);
    color fill = color(255,0,0);
    textWithOutline("GAME OVER", width/2, 200, outline, fill);
    
    textSize(20);
    textWithOutline("The poor platypus was eaten by "+e.name+"!", width/2, 240, outline, fill);
  }
}

While this is much more code than before, it has the advantage that I don’t have to stop the main loop anymore. Which means I can add a nice death or victory animation with little effort.

More importantly, I can (after another refactoring) restart the game:

class GameOverState extends State {
  MainGame main;
  String mainMessage;
  String subMessage;
  
  GameOverState(MainGame main, String mainMessage, String subMessage) {
    this.main = main;
    this.mainMessage = mainMessage;
    this.subMessage = subMessage;
  }

  void draw() {
    main.draw();
  
    textAlign(CENTER, TOP);
    textSize(40);
    color outline = color(255,255,255);
    color fill = color(255,0,0);
    textWithOutline(mainMessage, width/2, 200, outline, fill);
    
    textSize(20);
    textWithOutline(subMessage, width/2, 240, outline, fill);
    
    color outline = color(0,0,0);
    color fill = color(255,255,255);

    textSize(20);
    textWithOutline("Try again (Y/N)?", width/2, 280, outline, fill);
  }
  
  void keyPressed() {
    if(key == 'y' || key == 'Y') {
      current = new MainGame();
      current.setup();
    } else if(key == 'n' || key == 'N') {
      exit();
    }
  } 
}

class GameOverWonState extends GameOverState {
  GameOverWonState(MainGame main, int numberOfEnemies) {
    super(main, "YOU WON!", "The cute platypus outsmarted "+numberOfEnemies+" crocodiles!");
  }
}

class GameOverLostState extends GameOverState {
  GameOverLostState(MainGame main, Enemy e) {
    super(main, "GAME OVER", "The poor platypus was eaten by "+e.name+"!");
  }
}

To move to these states, I implement two new methods in MainGame:

  void gameOver(Enemy e) {
    current = new GameOverLostState(this, e);
  }
  
  void youWon() {
    current = new GameOverWonState(this, enemies.size()); 
  }

While trying this version, I noticed that I forgot to reset the score. Actually, the scoring is part of the main game loop, so I can move all the code related to it into MainGame.

Also, I noticed that I sometimes forgot to call setup() when changing states. A new method fixes all this:

void changeState(State next) {
  current = next;
  current.setup();
}

To clean up things even more, I’m splitting the code into several tabs. Since the project has now reached a certain complexity, I’m moving to version control with Git. If you don’t know what Git or distribute version control is, I suggest to read this article. Or you can try it online.

The whole project can be cloned from here. The version of this blog post is tagged with v8.

With the new cleaned up code, we can easily add an intro screen.

Previous: Highscore!
First post: Getting Started


Writing Games with Processing: Highscore!

22. December, 2013

What’s a game without a score? Boring!

Luckily, adding scoring to our game is a piece of cake. We just count the number of moves that Platty survives.

For this, we need another global variable:

int tileSize = 20;
int score = 0;

Then in the collision check, we increment the score:

  score ++;
  if(notFighting == 0) {
    ...

and lastly, we display score in drawBackground():

void drawBackground() {
  fill(174, 204, 27);
  rect(0, 0, width, height);
    
  fill(0);
  textAlign(LEFT, TOP);
  textSize(20);
  text("Scrore: "+score, 2, 2);
}

That’s it. Can you beat my high score?

Highscore

That’s it. Complete game in 210 lines of code.

Next: Time to clean up.

Previous: Winning
First post: Getting Started


Writing Games with Processing: Winning

21. December, 2013

Now that the player can lose the game, he needs a way to win. One idea we had was that crocodiles are greedy: When they run into each other hunting Platty, they start to fight over the food.

To achieve this, we need to add more checks to checkCollisions():

void checkCollisions() {
  ArrayList<Enemy> enemiesToCheck = new ArrayList<Enemy>();
  
  for(Enemy e: enemies) {
    if(e.closeTo(px, py)) {
      gameOver(e);
      return;
    }
    
    for(Enemy e2: enemiesToCheck) {
      if(e.closeTo(e2.x, e2.y)) {
        e.fighting = true;
        e2.fighting = true;
      }
    }
    
    enemiesToCheck.add(e);
  }
  
  int notFighting = 0;
  for(Enemy e: enemies) {
    if(!e.fighting) {
      notFighting ++;
    }
  }
  
  if(notFighting == 0) {
    youWon();
  }
}

As you can see, I added an inner loop to check if the current enemy is close to any other enemy (except itself, that’s why there is a second list).

I also count how many enemies are currently not in a fight.

At the end, if all enemies are fighting with each other, Platty has won:

void youWon() {
  draw();
  noLoop();
  
  textAlign(CENTER, TOP);
  textSize(40);
  color outline = color(255,255,255);
  color fill = color(255,0,0);
  textWithOutline("YOU WON!", width/2, 200, outline, fill);
  
  textSize(20);
  textWithOutline("The cute platypus outsmarted "+enemies.size()+" crocodiles!", width/2, 240, outline, fill);
}

Now just add a boolean to Enemy:

  boolean fighting;

Let’s see how that works:

Winning the Game
(Click image to start the animation)

What’s left? Scoring!

You can find the whole source code here.

Previous: Eating Platty
First post: Getting Started


Writing Games with Processing: Eating Platty

20. December, 2013

If you try the code from the last session, you’ll notice that the crocodiles can reach Platty but the game doesn’t end. We’re missing collision detection.

Following our KISS mantra, the collision detection should return true if a crocodile is “next” to a certain tile position (i.e. the distance in both x and y must be <= 1).

Add a new method to the class Enemy:

  boolean closeTo(int tx, int ty) {
    int dx = abs(x - tx);
    int dy = abs(y - ty);
    return dx <= 1 && dy <= 1;
  }

Next, we need to loop over all enemies and stop when one of them is close to Platty:

void checkCollisions() {
  for(Enemy e: enemies) {
    if(e.closeTo(px, py)) {
      gameOver(e);
      return;
    }
  }
}

Let’s add a fancy “Game Over” method:

void gameOver(Enemy e) {
  draw();
  noLoop();
  
  textAlign(CENTER, TOP);
  textSize(40);
  color outline = color(255,255,255);
  color fill = color(255,0,0);
  textWithOutline("GAME OVER", width/2, 200, outline, fill);
  
  textSize(20);
  textWithOutline("The poor platypus was eaten by "+e.name+"!", width/2, 240, outline, fill);
}

void textWithOutline(String message, int x, int y, color outline, color fill) {
  fill(outline);
  text(message, x-1, y);
  text(message, x+1, y);
  text(message, x, y-1);
  text(message, x, y+1);
  
  fill(fill);
  text(message, x, y);
}

Let’s test this game (I’m just pressing space to “wait”):

Broken Collision Detection
(Click the image to start the animation)

Hm… that’s not right. Benny should eat Platty one step earlier.

Let’s debug what is going on:

  boolean closeTo(int tx, int ty) {
    int dx = abs(x - tx);
    int dy = abs(y - ty);
    println(name+" dx="+dx+" dy="+dy);
    return dx <= 1 && dy <= 1;
  }

Output:

Kenny dx=14 dy=10
Benny dx=13 dy=10
Kenny dx=13 dy=9
Benny dx=12 dy=9

Notice how the enemy name makes debugging much easier.

Ah, distance is not in tiles, it’s in pixels. Let’s fix that:

  boolean closeTo(int tx, int ty) {
    int dx = abs(x - tx) / tileSize;
    int dy = abs(y - ty) / tileSize;
    //println(name+" dx="+dx+" dy="+dy);
    return dx <= 1 && dy <= 1;
  }

Corrected Game Over

Much better. And don’t forget to disable the debug output!

You can find the whole source code here.

Now that we have a way to lose the game, we should add a way to win.

Previous: Hunting Platty
First post: Getting Started


Writing Games with Processing: Hunting Platty

19. December, 2013

As it is, the game is pretty boring. The player has some control but no goal. Let’s add a routine which makes the enemies hunt the player.

There are many complex algorithms for path finding but we aim for something simple.

Add a new method to the class Enemy:

  void hunt() {
    int dx = signum(px - x) * tileSize;
    int dy = signum(py - y) * tileSize;
    
    x += dx;
    y += dy;
  }

This just moves the crocodile one step closer to where the player currently is. signum() is a simple helper function which returns the sign (1, 0, -1) of the argument:

int signum(float value) {
  return value < 0 ? -1 : value > 0 ? 1 : 0;
}

A small helper method then makes all the enemies hunt Platty in a loop:

void moveEnemies() {
  for(Enemy e: enemies) {
    e.hunt();
  }
}

Which leaves us with the last problem: When should the crocodiles move? One solution would be to move them in draw(). If you try it, you’ll see that this makes it a pretty short game – the screen is refreshed about 60 times per second but the key repeat is only 20 times per second, so poor Platty is eaten after a single step.

The solution is to move the enemies once after the player has made his move:

void movePlayer(int dx, int dy) {
  ...

  moveEnemies();
}

Et voila, hunting in 16 lines of code (click the image to start the animation):

Hunting Platty

You can find the whole source code here.

Next: Losing the game
Previous: Moving Around
First post: Getting Started


Writing Games with Processing: Moving Around

18. December, 2013

The game would be pretty boring if Platty would just sit there, waiting to be eaten. The player needs to be able to move him around:

void keyPressed() {
  if(key == CODED) {
    if(keyCode == UP) {
      movePlayer(0, -1);
    } else if(keyCode == DOWN) {
      movePlayer(0, 1);
    } else if(keyCode == LEFT) {
      movePlayer(-1, 0);
    } else if(keyCode == RIGHT) {
      movePlayer(1, 0);
    }
  } else if(key == ' ') {
    movePlayer(0, 0);
  }  
}

As you can see, I’m using the cursor keys to move the character. You could as easily use the keys WASD or any other combination but since we don’t need the mouse, the cursor keys felt like a good choice. Also note that the player can sit around and wait using the space bar.

The code to move the character is pretty simple:

void movePlayer(int dx, int dy) {
  px += dx * tileSize;
  py += dy * tileSize;
}

An alternative would be to always center the screen around the character and move everything else.

Or you can try to move the player one pixel at a time. Change the code to

void movePlayer(int dx, int dy) {
  px += dx;
  py += dy;
}

and play a bit. How does that feel?

When playing with the game, you might notice a slight problem: You can move outside of the visible screen. We need to check that the new coordinate is valid before moving the character:

void movePlayer(int dx, int dy) {
  dx *= tileSize;
  dy *= tileSize;
  
  int newX = px + dx;
  int newY = py + dy;
  if(newX >= 0
    && newX < width
    && newY >= 0
    && newY < height
  ) {
    px = newX;
    py = newY;
  }
}

Nice. We have a player character, we have control, we have enemies. What else do we need? Moving the enemies.

You can find the whole source code here.

Previous: Enemies
First post: Getting Started


Writing Games with Processing: Enemies

17. December, 2013

The next element of our game are the crocodiles. Since we can have several of them, let’s use a class to collect all data necessary to draw them:

class Enemy {
  color c;
  int x, y;
  String name;
  
  Enemy(String name) {
    this.name = name;
    c = color(222,40,107);
  }
  
  void draw() {
    fill(c);
    ellipse(x + tileSize/2, y + tileSize/2, tileSize, tileSize);
    
    fill(0);
    textAlign(CENTER, TOP);
    textSize(12);
    text(name, x + tileSize/2, y + tileSize + 2);
  }
}

As you can see, the code is pretty similar to the drawing Platty, the player character. I’m giving them names to make it easier to distinguish them on the screen and while debugging.

Next, we need a list of enemies and a helper function to easily create enemies:

ArrayList<Enemy> enemies = new ArrayList<Enemy>();
void addEnemy(int x, int y, String name) {
  Enemy enemy = new Enemy(name);
  enemy.x = x;
  enemy.y = y;
  enemies.add(enemy);
}

To draw them, we just loop over the elements in the list and call the draw() method of each element:

void drawEnemies() {
 for(Enemy e: enemies) {
    e.draw();
  }
}

Next, we add two enemies in the initial setup:

void setup() {
  size(640, 480); //VGA for those old enough to remember
  
  addEnemy(20, 20, "Kenny");
  addEnemy(600, 20, "Benny");
}

After adding the new drawEnemies() method to draw(), we’re done:

void draw() {
  drawBackground();
  drawPlatty();
  drawEnemies();
}

Let’s see what we’ve got:

RunPlattyRun_V2

You can find the final code here.

Next: Moving around
Previous: Setup and a Simple Player Character
First post: Getting Started


Writing Games with Processing: Setup and a Simple Player Character

16. December, 2013

We have an idea, now we need to write the game. Let’s use a screen size of 640 x 480:

void setup() {
  size(640, 480); //VGA for those old enough to remember
}

The next item on the task list is to render the game area. Let’s create a nice grass background:

void draw() {
  fill(174, 204, 27);
  rect(0, 0, width, height);
}

Too boring? Well, we can always add a more complex background later. Right now, we’re in development mode: We want to test some game ideas, quickly prototype something and play. Fancy graphics is our least priority right now.

What else do we need? The player character, Platty, the platypus:

int px = 320, py = 240;

void drawPlatty() {
  fill(235,220,160);
  rect(px, py, 20, 20);
  
  fill(0);
  textSize(18);
  textAlign(CENTER, CENTER);
  text("P", px+10, py+10);
}

void drawBackground() {
  fill(174, 204, 27); // green
  rect(0, 0, width, height); // fill whole screen
}

void draw() {
  drawBackground();
  drawPlatty();
}

That’s it. Again nothing fancy, just the bare minimum.

You will notice that some of the numbers are related but it’s not obvious from the code. At this point, we’ll have to make our first design decision: Can the player move freely (pixel by pixel) or is the movement tile base (as in chess)?

At this stage, both are equally simple to implement. An ego shooter or a jump&run would use fluid movement while a puzzle type game often uses tiles.

Let’s use tiles:

int px = 320, py = 240;
int tileSize = 20;

void drawPlatty() {
  fill(235,220,160);
  rect(px, py, tileSize, tileSize);
  
  fill(0);
  textSize(tileSize-2);
  textAlign(CENTER, CENTER);
  text("P", px+tileSize/2, py+tileSize/2-2);
}

Much better.

Note how I split tasks into different helper methods to keep the code readable. I could have done the player character rendering inside of the main draw() method. But by moving the code into different methods, I can keep things together that belong together while at the same time documenting my code. drawBackground() is like a comment explaining what the code in the method does. But unlike a comment, it can’t become outdated.

You can find the final version of the code here.

Next: Enemies!

First post in the series: Getting Started


Writing Games with Processing: Getting Started

15. December, 2013

Ever wanted to write your own game? Can’t be too hard, right?

Most games sold today are ego shooters. But the genre is sucked pretty dry. The most innovative games in the last years were simple, surprising and cheap. Examples are Braid,Β Fez, Thomas Was Alone. Those games didn’t thrive from multi-million development budgets, they throve from simple ideas. They were great not despite but because of their limitations.

In this series of blog posts, I’ll show you how to develop a very simple game using Processing.

Processing isΒ a simple environment to create amazing computer generated images using a simplified version of Java like the one on the right (code).

Komplexe Methoden –  M.1 Zufall und Rauschen –  M.1.6 Agenten im Raum –  M_1_6_01_TOOL

Komplexe Methoden – M.1 Zufall und Rauschen – M.1.6 Agenten im Raum – M_1_6_01_TOOL

While you download the software, we need an idea.

In my case, the idea came from a brainstorming session organized by Zurich Game Developers at the MechArtLab. Everyone had to buy a Kinder Surprise egg (illegal in the USA, btw.) and create a game with the content. The eggs in my group contained a platypus, a crocodile and a frog.

After a quick brainstorming session we came up with this game idea: “Kribbit, the frog, runs a zoo. A small zoo. A very small zoo. Only a single compound. He has two animals: A poor, lonely platypus and a couple of crocodiles. The crocodiles promised to be nice to the platypus and not to eat him. But every time Kribbit looks the other way, the crocodiles try to eat poor Platty.”

That’s it. Game idea? Check.

What? Too simple for you? Well, complex game = low chance of success.

Next post: Setup and a simple player character.


%d bloggers like this: